The Best Oils for At-Home Dermaplaning (And How to Choose the Right One)
If you've been wondering what oil to use for dermaplaning at home, here's the short answer:
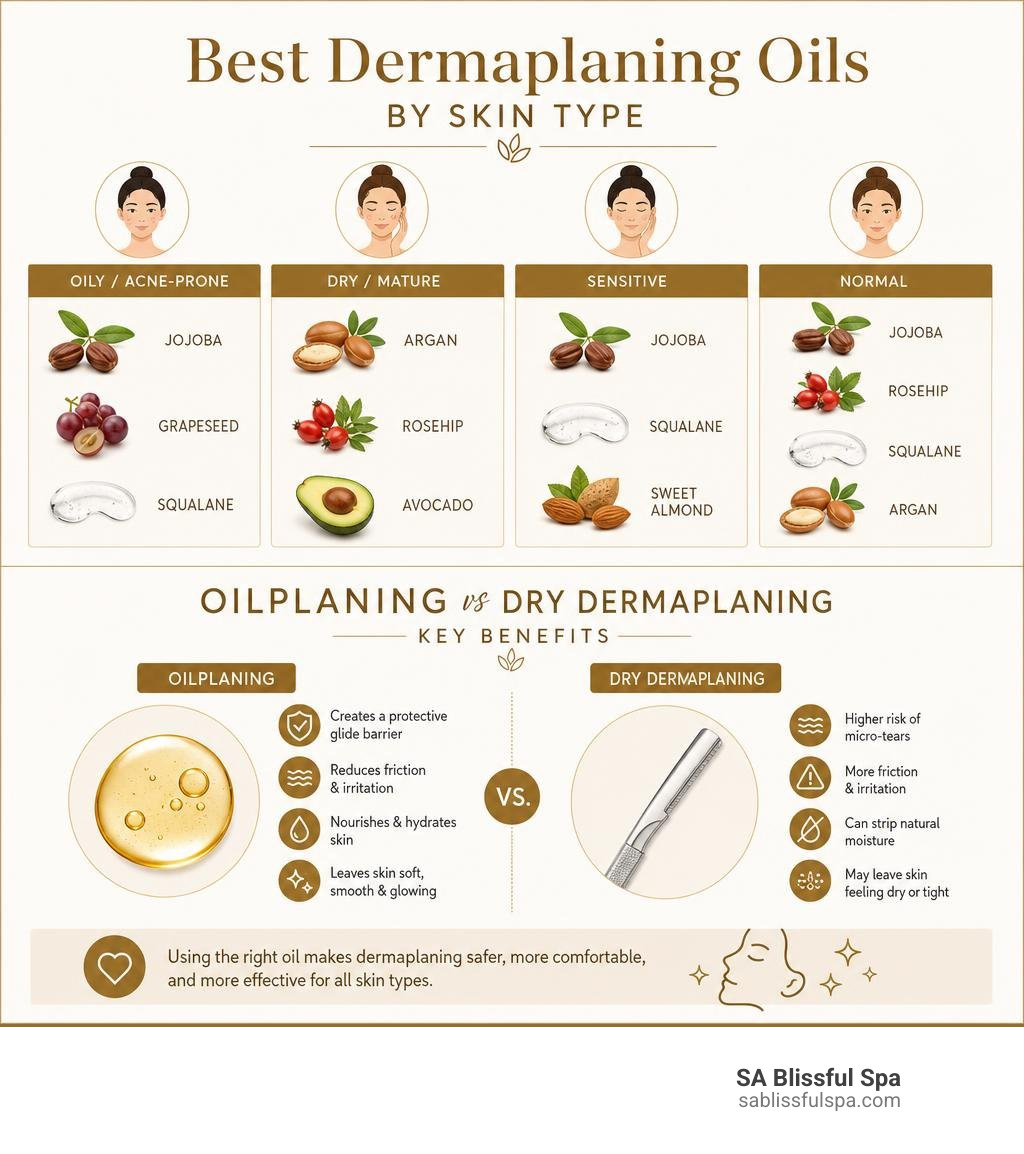
| Skin Type | Best Oil(s) |
|---|---|
| Oily / Acne-Prone | Jojoba, Squalane, Grapeseed |
| Dry / Mature | Argan, Rosehip, Avocado |
| Sensitive | Jojoba, Squalane, Sweet Almond |
| Normal | Jojoba, Rosehip, Squalane, Argan |
The top overall pick is jojoba oil. It's non-comedogenic, mimics your skin's natural sebum, and works for nearly every skin type. Squalane is a close second — lightweight, fast-absorbing, and gentle enough for oily and sensitive skin alike.
Dermaplaning at home has become one of the most popular DIY skincare treatments — and for good reason. A sharp blade removes dead skin cells and fine vellus hair (peach fuzz), leaving skin noticeably smoother and brighter. But one step that many people overlook is choosing the right facial oil before they pick up that blade.
Using the wrong oil — or skipping it entirely — can turn a simple at-home treatment into an uncomfortable, irritating experience. The right oil creates a protective layer between the blade and your skin, reduces friction, and even delivers nourishing ingredients while you work.
I'm Saloni Bhandari, a licensed esthetician and founder of SA Blissful Spa in Burlington, MA. Helping clients understand what oil to use for dermaplaning at home is something I do regularly, both in the treatment room and when coaching clients on their at-home routines. In the sections below, I'll walk you through everything you need to choose confidently.
Basic what oil to use for dermaplaning at home glossary:
Understanding Dermaplaning and the Role of Facial Oil
To understand why we need a "slip" oil, we first have to understand what happens during a dermaplaning treatment. Dermaplaning is a physical exfoliation method that gently scrapes away the stratum corneum (the outermost layer of dead skin cells) and fine vellus hair (commonly known as peach fuzz).
When professionals perform this in a clinical setting, they often work on completely dry skin to achieve the deepest possible exfoliation. However, dry dermaplaning requires a highly trained hand, a sterile surgical-grade blade, and precise tension. When you are working on your own face in your bathroom, dry dermaplaning carries a much higher risk of nicks, scratches, razor burn, and barrier disruption.
This is where "oilplaning" comes in. By applying a lightweight facial oil before you begin, you create a thin, protective buffer on the skin's surface.

Using an oil during the process provides several key benefits:
- Friction Reduction: The blade glides effortlessly over the skin rather than catching or dragging on dry patches.
- Skin Barrier Protection: The oil cushions the delicate skin barrier, preventing microscopic tears and reducing post-treatment redness.
- Softens Debris: It softens the dead skin cells and hair, making them easier for the blade to sweep away.
- Deep Hydration: Because dermaplaning temporarily makes the skin highly permeable, the nourishing lipids in your facial oil can absorb more deeply to lock in moisture.
To help you decide which method fits your comfort level, we can look at how they compare side-by-side:
| Feature | Dry Dermaplaning | Oilplaning (With Oil) |
|---|---|---|
| Exfoliation Depth | Deep surface exfoliation | Gentle, surface-level smoothing |
| Comfort Level | Can feel scratchy or dry | Highly comfortable and hydrating |
| Risk of Irritation | Moderate to high for beginners | Very low; highly forgiving |
| Best For | Normal, oily, or resilient skin | Dry, sensitive, mature, or beginner skin |
| Blade Glide | Requires tight manual pulling | Smooth, effortless glide |
To dive deeper into this industry debate, you can check out this helpful video breakdown: Dermaplaning vs Oil planing which method is best for you?. If you are new to the concept of physical exfoliation altogether, start with our primer on What is Dermaplaning to understand the core science of this treatment.
What Oil to Use for Dermaplaning at Home: The Ultimate Guide
When you are looking for the perfect slip medium, you cannot simply grab any bottle from your vanity. The ideal dermaplaning oil must be non-comedogenic (meaning it won't clog your pores), highly stable, and completely free of irritating additives.
Because dermaplaning removes the protective outer layer of your skin, whatever you apply during the service will penetrate much deeper than usual. This is why we must prioritize clean, simple, botanical formulas. For a comprehensive overview of safe home practices, refer to the What Oil to Use for Dermaplaning at Home Guide - BeautyandColour.
Here are the top recommended single-source oils that perform beautifully under a blade:
- Jojoba Oil: This is our absolute gold standard. Technically a liquid wax ester, jojoba oil closely mimics human sebum. Because of this, your skin accepts it easily without clogging, making it incredibly safe for almost all skin types.
- Squalane Oil: Derived from sugarcane or olives, squalane is ultra-lightweight, non-greasy, and boasts natural antibacterial properties. It provides a beautiful glide and helps calm active redness.
- Rosehip Oil: Packed with vitamins A and C, rosehip oil is fantastic for those looking to target uneven skin tone and aging. It has a drier texture, meaning it absorbs relatively quickly while still providing a smooth slip.
- Grapeseed Oil: An excellent, very lightweight option with mild natural astringent properties. It is high in linoleic acid, making it a dream for anyone prone to breakouts.
- Argan Oil: Rich in essential fatty acids and vitamin E, argan oil offers a slightly richer cushion, making it ideal for deeply dry or mature skin types.

How to Choose What Oil to Use for Dermaplaning at Home Based on Skin Type
To get the best results without causing unwanted breakouts or dry patches, you should match your oil to your specific skin type. Oils are primarily composed of oleic and linoleic fatty acids. Understanding this balance is the secret to flawless at-home treatments.
- Oily and Acne-Prone Skin: If your skin produces excess sebum, you want oils that are high in linoleic acid and low in oleic acid. When skin is deficient in linoleic acid, our natural sebum becomes thick and sticky, leading to clogged pores. Lightweight oils like squalane, grapeseed, and jojoba are non-comedogenic and will not cause breakouts when used for dermaplaning.
- Dry and Mature Skin: Dry skin lacks natural lipids. You will benefit from richer oils high in oleic acid, which restore the lipid barrier and lock in moisture. Argan oil, rosehip oil, and avocado oil are excellent choices that cushion the blade while deeply nourishing dry patches.
- Sensitive Skin: If your skin turns red at the mere thought of exfoliation, you need hypoallergenic, calming oils. Jojoba oil and pure squalane are your safest bets because they contain no added fragrances and closely match your skin's natural chemistry. For more safety tips, check out The Sensitive Skin Survival Guide to Dermaplaning.
- Normal Skin: If you have balanced skin, you can choose almost any lightweight, antioxidant-rich oil. Jojoba, squalane, or rosehip oil will work beautifully to give you a radiant, healthy glow.
For a detailed breakdown of how different oils interact with various skin concerns, you can explore the Best Oil for Dermaplaning According to Your Skin Type.
Key Features to Look For in Dermaplaning Oils
When shopping for your at-home slip oil, look for these key features to ensure safety and performance:
- Lightweight, Non-Greasy Texture: If an oil is too heavy or viscous, the blade will slide around unpredictably, which increases your risk of cutting yourself.
- Fast to Moderate Absorption Rate: You want an oil that stays on the surface long enough to provide glide but absorbs cleanly once you rinse your face.
- 100% Fragrance-Free: Avoid synthetic perfumes and essential oils (like lavender, citrus, or peppermint). These are highly sensitizing and can cause severe contact dermatitis when scraped into the skin with a blade.
- Minimal Ingredients: Look for single-ingredient oils (e.g., "100% Pure Cold-Pressed Jojoba Oil") to minimize the chance of an allergic reaction.
- High Stability: Oils like meadowfoam seed oil or jojoba are highly resistant to oxidation, meaning they won't degrade or spoil easily on your shelf.
Oils to Avoid and Potential Risks
Just as the right oil can elevate your routine, the wrong oil can cause a skincare disaster. Using heavy, highly comedogenic, or irritating oils can trap dead skin cells and bacteria directly inside your newly exfoliated hair follicles, leading to painful breakouts, folliculitis, and rashes.
Here are the primary oils you should never use for at-home dermaplaning:
- Coconut Oil: While highly moisturizing for the body, coconut oil is notoriously comedogenic. It forms a thick, suffocating barrier over facial pores. If you use it for dermaplaning, you are highly likely to experience a wave of breakouts a few days later.
- Olive Oil: Olive oil is rich in oleic acid, but it has a heavy molecular weight and can actually disrupt the skin's natural lipid barrier over time, leading to irritation and clogged pores.
- Mineral Oil & Baby Oil: These oils act as heavy occlusives. They do not absorb into the skin and can make the dermaplaning blade slip uncontrollably, which drastically increases your risk of cutting yourself.
- Essential Oils: Oils like tea tree, eucalyptus, or lavender might smell lovely, but they are highly concentrated allergens. Applying them during a physical exfoliation treatment is a recipe for chemical burns, redness, and extreme peeling.
If you experience severe redness, persistent itching, or cystic acne after an at-home session, stop immediately. These are signs of a compromised skin barrier or an allergic reaction, and you may need to consult a professional esthetician to help restore your skin's health.
How to Dermaplane at Home with Oil Safely
Dermaplaning at home is safe and highly effective, but only if you respect the blade and follow proper sanitary protocols. Before you even think about applying your oil, you must ensure your tools are completely sterile.
Never reuse a disposable blade more than once or twice, and always sanitize your tool with 70% isopropyl alcohol before and after use. Sharing blades with family members or roommates is a absolute safety hazard that can spread harmful bacteria. For a complete guide on selecting safe home tools, check out Smooth Moves Our Guide to the Best Dermaplaning at Home.
Step-by-Step: How to Apply What Oil to Use for Dermaplaning at Home
Follow this exact protocol for a safe, glow-inducing at-home oilplaning session:
- Double Cleanse: Start with a clean slate. Wash your face thoroughly to remove all makeup, sunscreen, and daily grime. Pat your skin completely dry with a clean towel. Note: Never apply oil to damp skin, as the water will cause the oil to bead up, leading to an uneven, patchy glide.
- Apply Your Slip Oil: Dispense 3 to 5 drops of your chosen facial oil onto your fingertips. Gently press and massage the oil evenly across your face and neck. You want a very thin, uniform layer. Your skin should feel slippery, not heavy or greasy. If you apply too much, gently blot the excess with a clean tissue.
- Hold the Skin Taut: Using your non-dominant hand, pull a section of your skin firmly upward and outward. This flattens the skin's surface and prevents the blade from catching on loose tissue or folds.
- Angle the Blade: Hold your clean dermaplaning tool in your dominant hand at a precise 45-degree angle against your skin.
- Use Short, Feather-Light Strokes: Using absolutely zero downward pressure, make short, gentle, downward strokes in the direction of your hair growth. Let the sharpness of the blade do the work. Do not go over the same area more than two or three times.
- Wipe the Blade Frequently: Keep a clean tissue nearby. After every few strokes, wipe the accumulated peach fuzz, dead skin, and oil residue off the blade.
- Rinse and Cleanse: Once finished, gently wipe your face with a warm, damp microfiber cloth to remove any remaining oil and debris.
- Post-Care Hydration: Immediately apply a soothing, alcohol-free hydrating serum (such as hyaluronic acid) followed by a gentle, barrier-supporting moisturizer. Skip all active ingredients—including retinoids, vitamin C, AHAs, and BHAs—for at least 48 hours. Always apply a broad-spectrum SPF 30+ the following morning, as your freshly exfoliated skin will be highly sensitive to UV damage.
Frequently Asked Questions about Dermaplaning Oils
Can I use baby oil for dermaplaning at home?
We strongly advise against using baby oil for dermaplaning. Baby oil is primarily composed of synthetic mineral oil and synthetic fragrances. Because mineral oil is a heavy, non-absorbent occlusive, it sits as a thick layer on top of the skin. This makes the surface incredibly slick and greasy, which reduces your control over the blade and makes precise strokes very difficult. Additionally, the synthetic fragrances in baby oil can easily penetrate the freshly exfoliated skin barrier, leading to contact dermatitis, redness, and clogged pores. Stick to lightweight, natural botanical oils like squalane or jojoba instead.
How often should I dermaplane at home with oil?
At-home dermaplaning with oil should be performed every 3 to 4 weeks. This timeline matches your skin's natural cellular renewal cycle, which takes roughly 28 days. Exfoliating more frequently than this will not give you better results; instead, it will strip away your healthy, living skin cells before they are ready to shed. This leads to a severely compromised skin barrier, chronic redness, burning, and increased sensitivity. If you want to maintain your glow between sessions, focus on daily hydration and gentle, non-abrasive skincare.
What is the average cost of professional dermaplaning vs at-home?
When looking at internet data, the average cost of a professional dermaplaning session is around $124, though prices can range widely from $50 to $350 per treatment depending on your location, the spa, and whether the service is combined with other advanced treatments like chemical peels or clinical facials. Please note that these are average industry costs based on internet research and do not represent the actual pricing at SA Blissful Spa.
By comparison, performing the treatment at home is highly cost-effective. A single 1 oz bottle of high-quality dermaplaning slip oil costs between $15 and $30. Because you only use 3 to 5 drops per service, a single bottle can easily yield 150+ treatments, bringing your per-treatment oil cost down to just a few cents.
However, while at-home care is budget-friendly, it cannot replace the deep exfoliation, safety, and relaxation of a professional treatment. If you want to experience the ultimate, worry-free glow, we highly recommend booking a professional Dermaplaning session.
Conclusion
Mastering the art of at-home dermaplaning comes down to preparation, technique, and—most importantly—knowing what oil to use for dermaplaning at home. By selecting a high-quality, lightweight, non-comedogenic oil like jojoba or squalane that matches your unique skin type, you can enjoy a safe, smooth, and deeply hydrating exfoliation session right in your own bathroom.
While DIY routines are a fantastic way to maintain your skin between professional visits, nothing quite compares to the precision, safety, and luxury of a clinical treatment. At SA Blissful Spa in Burlington, MA, we specialize in offering personalized, high-end skincare treatments designed to elevate your natural beauty.
We proudly serve clients throughout Middlesex County, including Arlington, Bedford, Belmont, Billerica, Carlisle, Concord, Lexington, Lincoln, Melrose, North Reading, Reading, Stoneham, Wakefield, Watertown, Wilmington, Winchester, and Woburn. Whether you are looking for a deeply hydrating facial, a customized peel, or a professional dermaplaning treatment to safely sweep away dead skin and peach fuzz, our expert team is here to pamper you in our serene, welcoming environment.
Ready to experience a professional-grade glow? Book a Professional Dermaplaning Session at SA Blissful Spa today, and let us take your skincare journey to the next level!