Learning how to wax upper lip at home can save you time, money, and give you smooth results that last up to 4 weeks. Here’s the quick process:
Quick Steps:
1. Prep: Clean skin, trim hair to 1/4 inch, apply baby powder
2. Apply: Spread hard wax in direction of hair growth
3. Remove: Pull strip quickly against hair growth while holding skin taut
4. Soothe: Apply aloe vera gel and avoid sun for 24 hours
As one first-time waxer shared: “It’s easy,” they said. “It doesn’t hurt at all,” they said. But that wasn’t my experience. The truth is, with the right technique and preparation, upper lip waxing at home can be nearly painless and highly effective.
Waxing removes hair from the root, giving you longer-lasting smoothness compared to shaving’s stubble or the chemical irritation of depilatory creams. While the initial pull might sting for 0.2 seconds, the results speak for themselves – hair grows back finer over time with regular waxing.
The key is understanding proper technique, choosing quality hard wax designed for sensitive facial skin, and following expert aftercare steps to prevent irritation or ingrown hairs.
I’m Saloni Bhandari, an experienced esthetician and founder of SA Blissful Spa who has helped countless clients master their skincare routines. Through my years of providing professional waxing services, I’ve developed proven techniques for how to wax upper lip at home safely and effectively. Let me guide you through the process step-by-step so you can achieve salon-quality results in your own bathroom.

How to wax upper lip at home vocabulary:
– does waxing cause dark upper lip
– does waxing upper lip cause more hair growth
– best way to remove female mustache hair

If you’ve ever stood in front of your bathroom mirror debating between a razor and tweezers, you’re not alone. The upper lip hair removal struggle is real, but understanding your options makes all the difference when learning how to wax upper lip at home.
Root removal is waxing’s biggest superpower. Unlike shaving that cuts hair at skin level, waxing yanks each strand from the follicle. This means you get long-lasting smoothness for 2-4 weeks instead of dealing with stubble every other day. Even better, slower regrowth happens over time – hair comes back finer and less dense with regular waxing sessions.
Shaving might seem like the quick fix, but that shaving stubble appears within 24-48 hours. Plus, razor burn on delicate facial skin? No thank you. The blunt cut ends make hair look thicker too, which is exactly what we’re trying to avoid.
Threading precision is impressive – those eyebrow artists make it look effortless. But threading your own upper lip requires serious skill and steady hands. Most of us end up with uneven results and sore fingers from all that practice.
Depilatory creams chemicals dissolve hair at the surface, but they smell awful and can burn sensitive facial skin. The results fade quickly since the root stays put. Chemical burns on your face aren’t worth the convenience.
IPL cost puts it in a different league entirely. These devices run $200-$1,500 and only work on dark hair. If you have blonde or light upper lip hair, you’re out of luck.
| Method | Duration | Pain Level | Cost Range* | Best For |
|---|---|---|---|---|
| Waxing | 2-4 weeks | Moderate (0.2 seconds) | $10-$45 per kit | Most hair types |
| Shaving | 1-2 days | Low | $5-$30 razors | Quick touch-ups |
| Threading | 2-3 weeks | Moderate | $15-$60 per session | Precise shaping |
| Depilatory cream | 3-7 days | Low | $8-$25 per tube | Sensitive to pain |
| IPL | Permanent reduction | Moderate | $200-$1,500 devices | Dark hair only |
*Average costs based on internet data, not SA Blissful Spa pricing
The cost-range for at-home waxing wins hands down. One quality wax kit provides multiple sessions, making it more budget-friendly than regular salon visits or expensive devices.
Yes, there’s ingrown-hair-risk with waxing, but proper aftercare dramatically reduces this concern. Gentle exfoliation 48 hours post-wax keeps those follicles clear and happy. The temporary discomfort of waxing beats the daily annoyance of other methods – especially when you master the technique at home.

Getting the right supplies is half the battle when learning how to wax upper lip at home. Think of it like cooking – you wouldn’t try to make a soufflé with a rusty whisk and a broken oven, right?
Hard wax is your best friend for upper lip waxing. Unlike soft wax that sticks to everything (including your skin – ouch!), hard wax only grabs onto the hair. It hardens as it cools and peels off without needing fabric strips. This makes it much gentler on the delicate skin around your mouth.
Soft wax requires those cloth strips you’ve probably seen in movies where someone screams dramatically. While it works great for legs, it’s pretty aggressive for your face. Save yourself the drama and stick with hard wax.
Sugar wax is the natural option made from sugar, lemon juice, and water. It’s gentler than traditional wax, but honestly? It takes some serious practice to get the technique down. If you’re just starting out, hard wax is more forgiving.
Your essential toolkit should include high-quality hard wax beads, a wax warmer (or microwave-safe container if you’re improvising), and wooden spatulas for precise application. You’ll also need a pre-wax cleanser, baby powder (make sure it’s talc-free), and a magnifying mirror with good lighting. Trust me, squinting at your reflection in poor lighting is a recipe for wonky results.
Don’t forget tweezers for catching any stubborn strays and after-wax soothing gel to calm your skin afterward.
Here’s the thing about hair length – it needs to be just right, like Goldilocks’ porridge. Your hair should be 2-3mm long (about the size of a grain of rice). Too short and the wax won’t grab it. Too long (over 1/2 inch) and you’ll want to trim it down first.
Always do a patch test 24 hours before waxing your face. Apply a small amount of wax to your inner arm and see how your skin reacts. It’s much better to find an allergy on your arm than on your upper lip before a big meeting!
Gentle exfoliation 24 hours before waxing helps remove dead skin cells and prevents ingrown hairs. Use a soft washcloth or gentle scrub – nothing too harsh.
Now, let’s talk about when you absolutely shouldn’t wax. If you’re using retinol, tretinoin, or other retinoids, skip the wax. Same goes if you’re taking isotretinoin (Accutane) – scientific research shows this increases your risk of scarring. Active acne, sunburned skin, or recent chemical peels are also red flags.
For more professional insights, check out our guide on upper lip waxing.
Not all wax kits are created equal. Look for quality ingredients like chamomile, aloe vera, or calendula – these soothing additions help minimize irritation on sensitive facial skin.
Temperature control is crucial. Hard wax should reach a honey-like consistency at 150-170°F. It needs to be warm enough to spread smoothly but not so hot that it burns your skin. Nobody wants to explain a wax burn to their coworkers!
If your skin tends to be reactive, invest in sensitive skin formulas specifically designed for facial use. These typically contain fewer fragrances and harsh chemicals that could cause irritation.
Professional-grade products often provide better results and safety features than bargain-bin options. Sometimes it’s worth spending a little more for peace of mind. Learn more about professional techniques at our professional hair wax removal page.
Now for the main event – let’s walk through how to wax upper lip at home with professional precision. The secret to salon-quality results lies in breaking your upper lip into manageable sections rather than trying to tackle the entire area at once.
Think of your upper lip as having five distinct zones: the two outer corners, two middle sections, and that tricky center area right below your nose. This precision approach ensures you don’t miss any spots and gives you better control over the process.
Setting yourself up for success starts before you even touch the wax. Find a spot with excellent lighting – preferably near a window during the day or under a bright bathroom light. Your magnifying mirror will become your best friend here, helping you see those sneaky fine hairs that regular mirrors miss.
Clean hands and clean skin are non-negotiable. Wash your hands thoroughly, then cleanse your upper lip area with a gentle face wash or pre-wax cleanser. Pat the area completely dry with a clean towel. Even the tiniest bit of moisture will sabotage your wax’s ability to grip the hair properly.
Here’s where many people skip a crucial step: dusting with baby powder. Apply just a light coating of talc-free baby powder to absorb any lingering oils or moisture. Think of it as creating the perfect surface for your wax to do its job. Don’t go overboard – you want a light dusting, not a powdered donut situation.
If you’re worried about pain, you have options. Ice the area for 2-3 minutes before starting, or try a topical numbing spray designed specifically for waxing. Some people find that taking an over-the-counter pain reliever 30 minutes beforehand takes the edge off.
Getting your wax to the right temperature is like Goldilocks – it needs to be just right. Heat your hard wax according to the package instructions, usually starting with 1.5-2 minutes in the microwave and checking every 30 seconds. You’re aiming for a thick honey consistency that spreads smoothly but isn’t runny.
Always test the temperature on your wrist first. The wax should feel warm and comfortable, never hot enough to make you flinch. Your facial skin is much more sensitive than your wrist, so if it feels too warm there, let it cool down a bit more.
Apply the wax in the direction your hair grows, starting from the center of your cupid’s bow and working toward one corner. Use your wooden spatula to create a thin, even layer with a slightly thicker edge – this “lip” gives you something to grip when it’s time for removal.
Work on one half of your upper lip at a time. This approach gives you better control and prevents the wax from cooling too much before you can remove it. If you’re using wax strips, here’s a money-saving tip: you can reuse the same strip as long as it stays sticky.
After waxing, grab your tweezers for any stragglers. Pluck these remaining hairs in the direction they grow to avoid breakage and those annoying ingrown hairs later.

Timing your removal is crucial for how to wax upper lip at home success. Let hard wax cool and set for 1-2 minutes until it feels flexible but not sticky when you touch it lightly. Too soft and it won’t grip the hair properly. Too hard and it becomes less effective.
Here’s a professional trick that makes a huge difference: tuck your upper lip under your teeth. This creates taut skin, reducing movement and minimizing pain during removal. It might feel awkward at first, but it’s a game-changer.
When you’re ready to pull, take a deep breath, exhale completely, and remove the wax in one quick, smooth motion against the direction of hair growth. Pull parallel to your skin surface, not upward. Think of it like removing a band-aid – hesitation only makes it worse.
Immediately press your hand firmly against the waxed area for about 5 seconds. This pressure technique helps minimize pain and reduces that initial redness. It’s like your skin’s way of saying “thank you” for the immediate comfort.
Never, ever wax the same area twice in one session. This golden rule prevents burns, excessive irritation, and potential skin damage. If you missed some hairs, that’s what your tweezers are for. Your skin will thank you for this restraint, even if your perfectionist tendencies protest.

Congratulations! You’ve successfully completed your first how to wax upper lip at home session. Now comes the equally important part – taking care of your newly smooth skin.
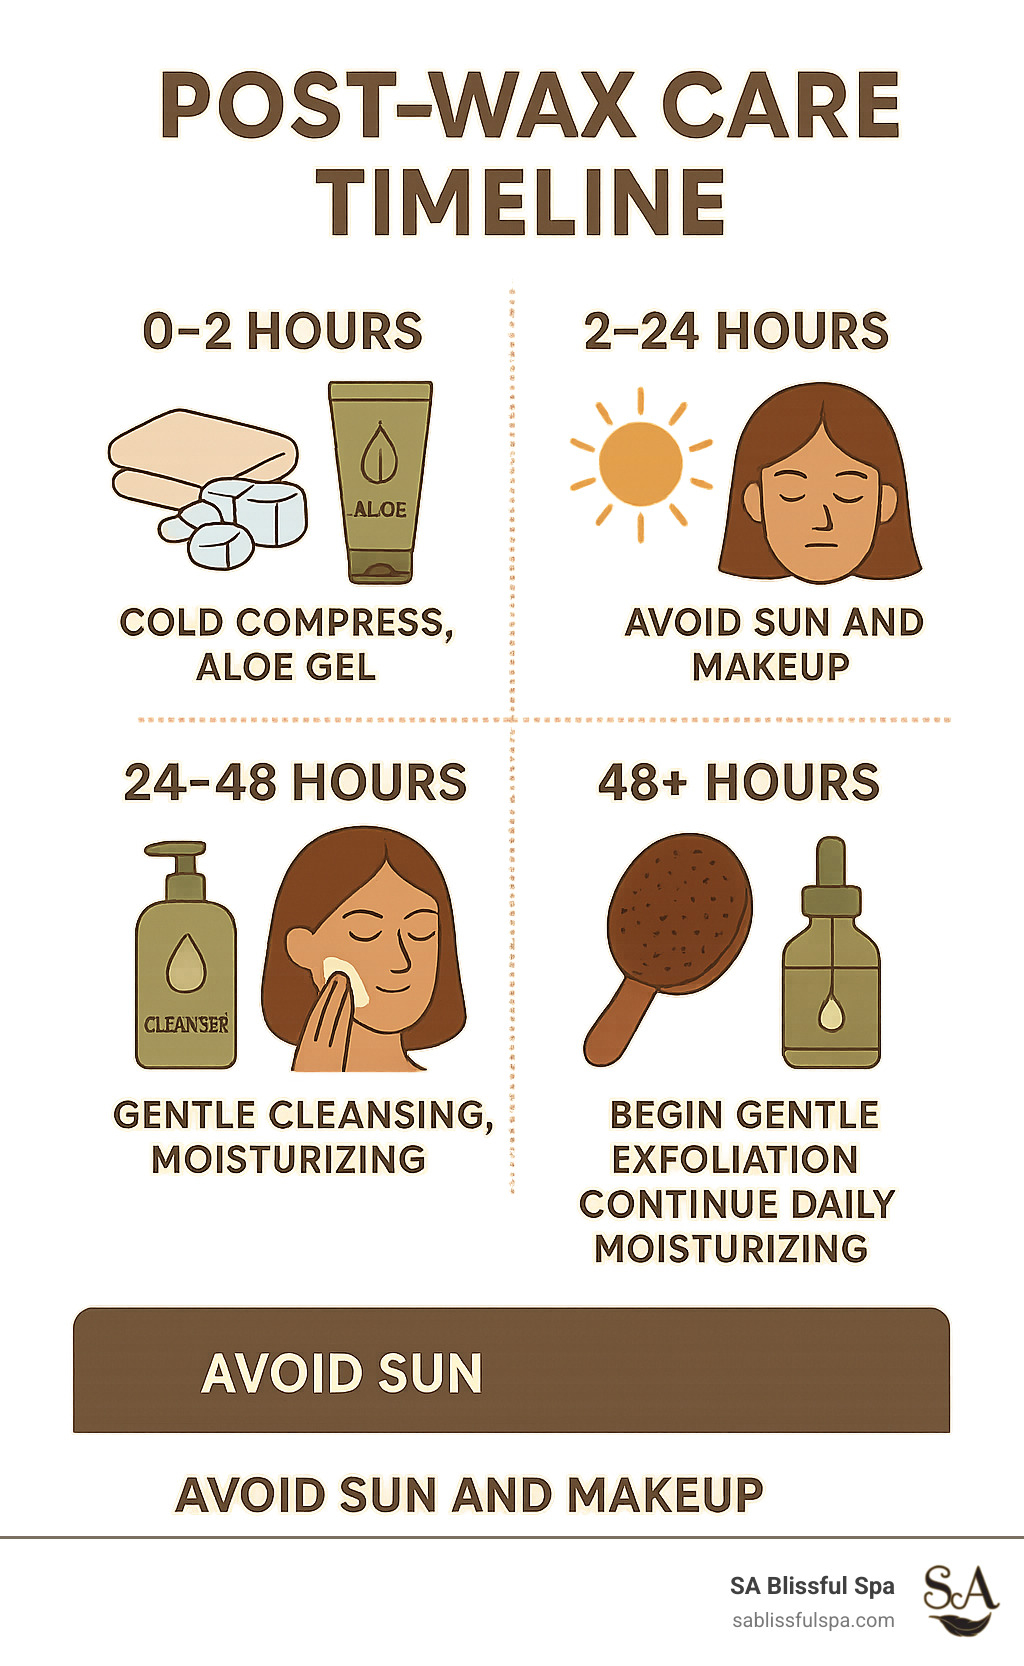
Don’t panic if you see some redness for 2-24 hours after waxing. This is completely normal and shows that the waxing worked properly. Your skin might also feel slightly tender or look a bit puffy around the hair follicles. Think of it like a mini workout for your skin – it needs time to recover.
The first thing you should do is grab a cold compress and gently press it against the waxed area for 5-10 minutes. This simple step works wonders for reducing inflammation and providing immediate relief. Follow this with aloe vera gel – the real stuff, not the bright green kind with added fragrances. Pure aloe vera acts like nature’s cooling system for irritated skin.
Witch hazel makes an excellent gentle cleanser for removing any stubborn wax residue while providing antiseptic benefits. Dab it on with a cotton pad rather than rubbing, since your skin is still sensitive from the waxing process.
For the next 24 hours, avoid sun exposure completely or use a mineral sunscreen if you absolutely must go outside. Your freshly waxed skin is more vulnerable to UV damage during this healing period. Also skip makeup for at least 8 hours to let your pores breathe and recover. Hot showers, saunas, and steam rooms are also off-limits for now – your skin doesn’t need any extra heat stress.
Once you hit the 48-hour mark, it’s time to start gentle exfoliation to prevent those pesky ingrown hairs. Use a soft washcloth or gentle scrub 2-3 times per week, but be kind to your skin. Think gentle circular motions, not aggressive scrubbing.
When Things Go Wrong: Troubleshooting Guide
Sometimes your skin might react differently than expected. Here’s how to tell what’s happening and what to do about it.
Breakouts versus hives can look confusingly similar at first glance. Breakouts show up as small, pus-filled bumps that appear 24 or more hours after waxing and stick around for several days. These respond well to benzoyl peroxide in low percentages. Hives, on the other hand, are raised, itchy welts that appear suddenly and usually clear up quickly. If you see hives, apply antihistamine cream and consider discontinuing that particular wax brand.
Burn care becomes necessary if you used wax that was too hot. The moment you realize you have a burn, apply cool water immediately, then follow up with aloe vera gel or hydrocortisone cream. Resist the urge to pick or peel any damaged skin, and definitely consult a healthcare provider if you see blistering.
Ingrown hair prevention starts with that gentle exfoliation we mentioned, but consistency is key. Moisturize daily with non-comedogenic products that won’t clog your pores, and avoid anything tight or rough that might rub against the freshly waxed area.
Everyone’s skin heals at its own pace. Some people bounce back in a few hours, while others need the full 24-hour recovery period. Pay attention to what your skin is telling you, and don’t hesitate to baby it a little extra if needed.
For more insights about what to expect with future waxing sessions and hair regrowth patterns, check out our detailed guide on More info about Does Waxing Upper Lip Cause More Hair Growth? – spoiler alert: it actually does the opposite!
While learning how to wax upper lip at home can be incredibly rewarding, it’s not suitable for everyone. Understanding your personal risk factors and recognizing potential complications helps ensure you have a safe, successful experience.
When Your Skin Needs Extra TLC
If you’re dealing with sensitive skin conditions like eczema, psoriasis, or rosacea in your upper lip area, waxing might not be your best friend right now. These conditions already compromise your skin barrier, and adding the trauma of hair removal can trigger flare-ups or worsen existing irritation.
Active acne is another red flag. Waxing over inflamed breakouts can spread bacteria to other areas of your face and potentially cause scarring. Wait until your skin calms down before attempting any hair removal.
Got a sunburn? Put that wax kit away! Sunburned skin is already damaged and inflamed. Waxing over it is like adding insult to injury – literally. Wait until your skin is completely healed and back to its normal color.
Medication Considerations That Matter
Certain medications can turn a routine waxing session into a skin disaster. If you’re taking blood thinners like warfarin, you’ll likely experience more bruising and potentially bleeding during the process.
Isotretinoin (Accutane) is perhaps the most important contraindication to remember. This powerful acne medication makes your skin incredibly fragile and prone to scarring. Even if you’ve recently stopped taking it, wait at least six months before waxing.
Topical retinoids like tretinoin, adapalene, or tazarotene also increase skin sensitivity significantly. These anti-aging and acne-fighting ingredients thin the top layer of your skin, making it more susceptible to tearing during wax removal.
Recent use of alpha hydroxy acids (AHAs) can similarly leave your skin more vulnerable. If you’ve been using glycolic acid or lactic acid products, take a break for at least a week before waxing.
Pregnancy and Hormonal Roller Coasters
Pregnancy hormones can be quite the game-changer when it comes to pain tolerance and skin sensitivity. While waxing isn’t dangerous during pregnancy, many women find they experience significantly more discomfort than usual. Your skin might also react differently due to increased blood flow and hormonal fluctuations.
Hormonal changes during menstruation, menopause, or when starting new birth control can also affect how your skin responds to waxing. You might notice increased sensitivity during certain times of your cycle.
Finding Your Perfect Timing
The sweet spot for waxing frequency is every 2-4 weeks. This timing allows your hair to grow to the optimal length (that 2-3mm we talked about earlier) while maintaining consistently smooth results.
Waxing too frequently can irritate your skin and doesn’t give hair enough time to grow properly. On the flip side, waiting too long makes the process more painful because longer hair requires more force to remove.
Debunking the “Thicker Hair” Myth Once and for All
Let’s put this persistent beauty myth to rest: waxing absolutely does not make hair grow back thicker or darker. This misconception probably exists because people often switch from shaving to waxing and notice the difference in texture.
When you shave, you create a blunt edge that feels coarse as it grows out. When hair grows back after waxing, it has its natural tapered end, which actually feels softer. With regular waxing sessions, hair typically grows back finer and less dense over time because you’re weakening the hair follicle.
Think of it this way – if waxing made hair thicker, wouldn’t professional estheticians and people who’ve been waxing for years have incredibly thick hair? The opposite is actually true!
Understanding these safety considerations helps you make an informed decision about whether how to wax upper lip at home is right for you, and when the timing might be perfect for your first attempt.
This is probably the most common worry I hear about how to wax upper lip at home, and I completely understand why! The good news? Waxing absolutely does not make your hair grow back darker or thicker. This persistent myth has been causing unnecessary anxiety for years.
Here’s what’s actually happening: When you shave, you’re cutting the hair at its thickest point right at the skin’s surface, creating that stubby, coarse feeling. But when you wax, you’re pulling the entire hair out from the root, so when it grows back, it has its natural, soft tapered end.
The reality is even better than that. With regular waxing sessions, most people notice their hair actually grows back finer and sparser over time. This happens because repeatedly removing hair from the root can gradually weaken the hair follicles. So you’re not just maintaining the status quo – you’re actually improving your situation with each session!
Most of my clients enjoy beautifully smooth skin for 2-4 weeks after their upper lip waxing. But here’s the thing – your first time might be a bit different from your tenth time.
First-time waxers often see some regrowth around the 1.5-2 week mark. Don’t worry if this happens to you! Your hair follicles are still adjusting to this new routine. Experienced waxers typically go a full 3-4 weeks between sessions and sometimes even longer.
Several factors influence how long your results will last: your individual hair growth rate (which varies from person to person), hormonal fluctuations throughout your cycle, your age and genetics, and importantly, how consistent you are with your waxing schedule.
Here’s a pro tip I always share: maintain regular sessions every 3-4 weeks rather than waiting until you see full regrowth. This keeps your hair in the same growth cycle and actually makes each session less painful and more effective.
While most people have smooth sailing with their how to wax upper lip at home journey, it’s smart to know what to do if things don’t go as planned.
For mild reactions like redness, slight swelling, or small bumps around the hair follicles, you can handle these at home. Apply cold compresses for 10-15 minutes at a time, use a gentle, fragrance-free moisturizer, and take an oral antihistamine if you’re feeling itchy. Most importantly, avoid sun exposure and harsh skincare products until your skin calms down.
However, some reactions need professional attention. Contact a healthcare provider immediately if you experience severe swelling or blistering, signs of infection like pus or increasing redness and warmth, allergic reaction symptoms such as widespread hives or difficulty breathing, or any burns or significant skin damage.
Prevention is always your best bet. Always perform that patch test 24 hours before your full waxing session – I know it seems like extra work, but it’s so worth the peace of mind. Choose high-quality, hypoallergenic wax products, follow all the pre and post-care instructions we’ve covered, and honestly, if you have particularly sensitive skin, consider getting your first few sessions done professionally to see how your skin responds.
Everyone’s skin is different, and what works perfectly for your friend might not be ideal for you – and that’s completely normal!
Learning how to wax upper lip at home opens up a world of convenience and confidence that fits perfectly into your self-care routine. You’ve now got all the tools and knowledge to achieve that silky-smooth lip area you’ve been dreaming about.
Practice makes perfect – and that’s especially true with waxing. Your first attempt might feel a bit clumsy (mine certainly was!), but each session gets easier as you develop your technique. Don’t get discouraged if you don’t nail it immediately. Even professional estheticians had to start somewhere.
The beauty of DIY waxing is that it saves you time – no more scheduling appointments or rushing to the spa before closing. You can wax on your schedule, whether that’s Sunday morning in your pajamas or a quick touch-up before date night.
Of course, there are times when having a professional backup makes perfect sense. If you’re dealing with particularly sensitive skin, trying waxing for the first time, or just want to treat yourself to some pampering, professional treatment can be invaluable.
At SA Blissful Spa, our experienced estheticians understand that every client’s skin tells a different story. We’ve helped countless clients throughout Burlington, Arlington, Bedford, Belmont, and surrounding Massachusetts communities master their skincare routines and feel confident in their own skin.
The confidence boost that comes from smooth, well-groomed skin really is priceless. When you look in the mirror and see that perfectly groomed upper lip area, you’ll know the effort was worth it. Plus, you’ll have a skill that serves you for years to come.
Whether you choose to perfect your at-home technique or prefer the luxury of professional treatment, beautiful skin is about consistency and care. Be gentle with yourself, follow the safety guidelines we’ve covered, and enjoy those smooth results.
Ready to explore what professional expertise can offer? Learn more about our comprehensive treatments at More info about our waxing services.
Your journey to smooth, confident skin starts with that first brave pull. You’ve got this!