Have you ever wondered, can you do a facial chemical peel at home to get that coveted professional glow without leaving your bathroom? The answer is a resounding yes—provided you proceed with knowledge, respect for the ingredients, and extreme caution. For addressing mild skin concerns like dullness or minor texture, at-home peels can be a fantastic tool in your skincare arsenal.
Here’s a quick overview of what that means:
At-Home Peels: These are exclusively superficial treatments designed for consumer safety. They use lower concentrations of acids, such as glycolic acid (typically 10-30%), lactic acid (10-40%), or salicylic acid (capped at 2%). Their primary goal is to provide gentle, consistent exfoliation to improve overall skin texture, brighten tone, and maintain clarity over time.
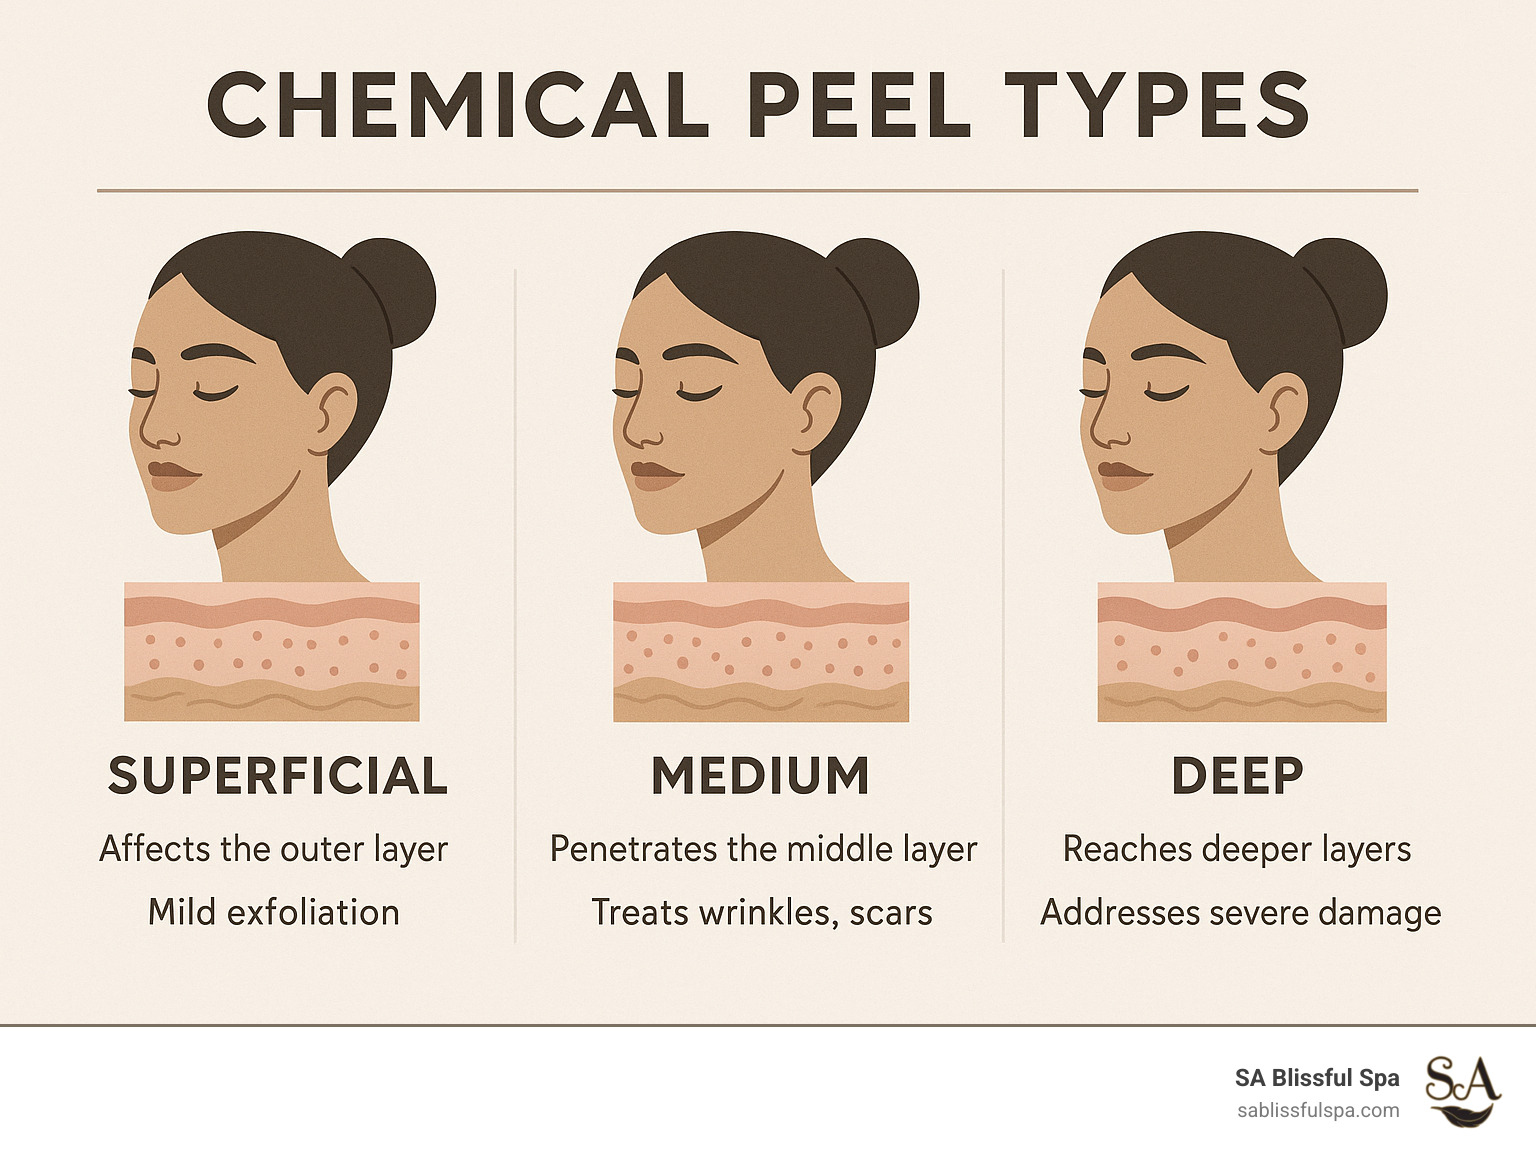
Professional Peels: Performed in a controlled clinical setting, these can be superficial, medium, or deep. They involve much stronger, medical-grade acids like high-percentage Trichloroacetic Acid (TCA) or phenol. These are reserved for trained, licensed professionals to address more severe concerns like deep-set wrinkles, significant sun damage, and acne scarring, and they come with considerable downtime and aftercare requirements.
The Golden Rule of Safety: Success with at-home peels hinges on three non-negotiable rules: always perform a patch test 24-48 hours before full application, follow the product’s instructions to the letter (especially regarding timing), and be diligent with high-SPF sun protection afterward. Attempting to rush the process or using a product that’s too strong can lead to irritation, burns, and pigmentation issues.
Though the term “chemical peel” might sound intimidating, these treatments, when used correctly, can be a legitimate game-changer for your skin’s health and appearance. Most people can benefit from incorporating a mild, suitable peel into their routine. This guide will walk you through everything you need to know to do so safely and effectively.
I’m Saloni Bhandari, an experienced esthetician and the founder of SA Blissful Spa. My passion lies in empowering clients to achieve their healthiest skin possible. Over the years, I’ve seen the incredible results of professional peels, and I also believe in the power of smart, safe at-home care. I’ve dedicated my career to understanding how to effectively perform these treatments and, just as importantly, how to teach others can you do a facial chemical peel at home as a way to maintain and improve their professional results.
Understanding the Peel: At-Home vs. Professional Treatments
Before you decide whether to DIY your way to brighter skin or book a professional appointment, it’s crucial to understand the science behind why chemical peels are so effective.
What is a Chemical Peel?
A chemical peel is a form of accelerated, controlled exfoliation. Skincare acids are applied to the skin to dissolve the intercellular “glue” (desmosomes) that holds dead, dulling cells together on the surface layer, known as the epidermis. This process triggers the skin’s natural renewal cycle, prompting faster cell turnover. As the old, damaged cells shed, they reveal the newer, healthier, and brighter skin underneath. The visible results can include a smoother and more refined texture, a reduction in breakouts and clogged pores, a lightening of dark spots (hyperpigmentation), and a softening of fine lines and wrinkles. For a deeper scientific look, the National Library of Medicine offers an excellent resource: A Practical Approach to Chemical Peels.
At-Home vs. In-Office Peels
The most significant differences between a peel you can buy online or in-store and one you receive from an esthetician or dermatologist are strength and depth of penetration.
Feature
At-Home Peels
Professional Peels
Typical acids
Low-% AHAs/BHAs, fruit enzymes
Higher-% AHAs/BHAs, TCA, Jessner’s, phenol
Penetration
Superficial (epidermis only)
Superficial, medium, or deep (dermis)
Downtime
None–light flaking
1–7 days (medium) / weeks (deep)
Cost (avg.)
$20–$100 per product
$150–$600+ per session*
Results
Gradual maintenance
Faster, dramatic change
Safety
Self-monitored
Professional oversight
*Average internet ranges; not SA Blissful Spa pricing.
At-home formulas are intentionally formulated to be mild for consumer safety. They work on the outermost layer of skin to provide a refresh and are great for maintenance. In contrast, a dermatologist might use a 70% glycolic acid solution or a 35% TCA peel—concentrations that are never sold for home use due to their potential for causing serious injury if misapplied. If your goals include major resurfacing for concerns like deep-set wrinkles or significant scarring, professional care is the only safe and effective option.
Choosing Your At-Home Peel: Ingredients & Strengths
Navigating at-home peels means becoming your own ingredient detective. Matching the right acid to your primary skin concern is the key to achieving the results you want without causing irritation.
Salicylic Acid (BHA, ≤2 %): As a Beta-Hydroxy Acid, salicylic acid is oil-soluble. This unique property allows it to penetrate deep into the pore lining to dissolve sebum, oil, and debris. This makes it the gold standard for treating blackheads, whiteheads, and active acne breakouts.
Glycolic Acid (AHA, 10–30 %): Derived from sugar cane, this Alpha-Hydroxy Acid has the smallest molecular size of all AHAs. This allows it to penetrate the skin quickly and effectively, making it excellent for stimulating collagen, smoothing fine lines, and brightening overall skin tone. However, this potency also means it can be more irritating for sensitive skin types.
Lactic Acid (AHA, 5–10 %): A gentler AHA derived from milk, lactic acid has a larger molecular size than glycolic acid, meaning it works more on the surface. It’s also a natural humectant, meaning it helps the skin retain moisture. This makes it an ideal choice for those with dry or sensitive skin who want exfoliation without the risk of dehydration.
Mandelic Acid (AHA, ≤10 %): This AHA is derived from bitter almonds and has an even larger molecular structure. It penetrates the skin very slowly and gently, minimizing irritation. It’s particularly effective for treating hyperpigmentation (like sun spots or post-acne marks), especially on reactive skin or darker skin tones that may be more prone to post-inflammatory pigmentation.
Fruit Enzymes: Ingredients like papain (from papaya) and bromelain (from pineapple) are not acids but proteins that digest the keratin protein in dead surface cells. They offer the most gentle form of exfoliation and are a perfect starter option for anyone new to peels or with extremely sensitive skin.
Stay Within Safe Percentages
The effectiveness of a peel isn’t just about the percentage of acid; it’s also about the product’s pH and overall formulation. However, as a rule of thumb, you should be wary of products marketed for home use with excessively high strengths. The FDA has issued warnings about the dangers of using professional-grade products without supervision. Anything above 30% glycolic, 10% lactic/mandelic, or 2% salicylic is best left to professionals. Never, under any circumstances, purchase pure 100% TCA or phenol for home use. The risks of chemical burns, permanent scarring, and severe pigmentation are far too high. Details: FDA warning.
Your Step-by-Step Guide to a Safe At-Home Peel
Proper preparation and meticulous follow-through are what separate a successful at-home peel from a skincare disaster. Follow these steps precisely for a safe and effective treatment.
Before You Peel
Preparation is key. Give your skin the best possible starting point by following these pre-peel rules:
Stop other exfoliants 3–5 days prior. This includes scrubs, exfoliating cleansers, and other acid-based serums (AHAs, BHAs). Using them too close to your peel can over-strip the skin and lead to a compromised barrier.
Pause retinoids for at least 7 days. Retinoids (like retinol and tretinoin) accelerate cell turnover. Combining them with a chemical peel is too much for the skin and can cause severe irritation, redness, and sensitivity.
Avoid tanning and direct sun exposure for 2 weeks. Applying a peel to sun-damaged or recently tanned skin is extremely risky and can result in burns and unpredictable pigmentation.
Patch-test behind your ear or on your jawline. This is the most critical safety step. Apply a small amount of the peel, leave it on for the recommended time, neutralize, and rinse. Wait 24-48 hours to check for adverse reactions like blistering, swelling, or intense, persistent redness. Mild tingling is normal; a severe reaction is not.
Application (Superficial Peel)
Cleanse and thoroughly dry your face. The peel needs a clean canvas to work evenly.
Protect sensitive areas. Apply a thin layer of petroleum jelly or a thick balm to the corners of your eyes, nostrils, and lips to prevent the acid from migrating and causing irritation.
Apply the peel. Using a cotton pad or a small fan brush, apply the solution in a thin, even layer. Start with less sensitive areas like the forehead, cheeks, and chin, and finish with the more sensitive areas around the nose and mouth.
Start a timer immediately. If it’s your first time, be conservative. Start with just 30–60 seconds, even if the product says you can leave it on for longer. You can gradually increase the time in subsequent sessions as your skin acclimates, but never exceed the product’s maximum recommended time (usually 3-5 minutes).
Monitor your skin. Mild tingling or a slight itching sensation is normal. An intense, painful burning sensation is not. If you feel significant pain, do not wait for the timer; neutralize and rinse immediately.
Neutralize and rinse. Once the time is up, apply the neutralizing solution that came with your kit. If one wasn’t provided, you can use a mixture of 1 tablespoon of baking soda in 4 tablespoons of cool water. This stops the acid from continuing to process. After neutralizing, rinse your face thoroughly with cool water for at least a minute.
Hydrate and moisturize. Pat your skin dry gently with a soft towel. Immediately apply a hydrating serum (like one with hyaluronic acid) followed by a rich, bland, and restorative moisturizer to soothe the skin and begin repairing the barrier.
Aftercare (Next 3–5 Days)
Be gentle. Cleanse with a mild, non-foaming cleanser. Avoid all scrubs, brushes, and other exfoliants.
Moisturize, moisturize, moisturize. Load up on moisturizers containing barrier-repairing ingredients like ceramides, niacinamide, and peptides. Apply morning and night, and whenever your skin feels tight or dry.
Sunscreen is non-negotiable. Your new skin is extremely vulnerable to UV damage. Apply a broad-spectrum SPF 30+ every single morning, even if you’re staying indoors. This is crucial to prevent post-inflammatory hyperpigmentation.
Hands off! You may experience some light flaking or peeling. Do not pick, pull, or scrub at it. Let the skin shed naturally to avoid scarring and infection.
Pause other actives. Hold off on using retinoids, vitamin C serums, or any other strong active ingredients until your skin feels completely back to normal and shows no signs of sensitivity.
Can You Do a Facial Chemical Peel at Home? Safety, Frequency & Side Effects
Understanding who should (and shouldn’t) use at-home peels, how often to use them, and what to expect afterward is fundamental to a safe and successful experience.
Who’s a Good Candidate?
Best for: Individuals with normal, oily, or combination skin types looking to address mild concerns like dullness, uneven texture, or minor breakouts. These skin types generally tolerate low-strength acids well.
Good for: Those with dry skin can also benefit, but they should stick with milder, hydrating acids like lactic acid and be extra diligent with post-peel moisturization.
Who Should Be Cautious or Avoid At-Home Peels?
Sensitive or rosacea-prone skin: It’s best to consult a professional. While some gentle options like mandelic acid or enzymes may be suitable, the risk of triggering a flare-up is higher. Professional guidance is key.
Darker skin tones: Use caution, as there is a higher risk of post-inflammatory hyperpigmentation (PIH) if the skin becomes irritated. Start with the gentlest acids (mandelic, lactic) and patch test diligently.
Active conditions: Do not perform a peel if you have active cold sores, warts, eczema, or psoriasis on the face, or if you have any open wounds or infections.
Certain medications: If you are taking Accutane (isotretinoin) or have in the last six months, do not use a chemical peel. Consult a doctor if you are pregnant, breastfeeding, or take other medications that increase skin sensitivity.
How Often?
Less is more when it comes to chemical exfoliation. Overdoing it can damage your skin’s protective barrier.
Enzyme peels or very mild acid pads: Can often be used 1–2 times per week, depending on the product and your skin’s tolerance.
Stronger at-home peels (e.g., 10–30% glycolic / 2% salicylic): These should be used much less frequently, typically only once every 2 to 4 weeks.
Listen to your skin: Signs you’re overdoing it include persistent redness, a tight or waxy appearance, stinging or burning when applying gentle products (like your moisturizer), or constant dryness and flaking. If you experience these, take a long break from all exfoliants and focus on repairing your skin barrier with gentle, hydrating products.
Common Side Effects & How to Minimize
It’s important to distinguish between expected reactions and signs of trouble.
Expected & Normal: Mild tingling or itching during application, temporary pinkness or redness immediately after, and light flaking a few days later are all normal parts of the process.
Warning Signs (Adverse Reactions): Intense, painful burning during the peel, blistering, oozing, crusting, or swelling are not normal. If you experience any of these, you may have a chemical burn. Rinse and neutralize immediately and seek medical care.
To minimize risks, always patch test, strictly follow the recommended timing, moisturize generously, and never, ever skip sunscreen. Sun exposure on freshly peeled skin is the number one cause of complications like burns and hyperpigmentation.
When to Skip the DIY and See a Professional
At-home peels are excellent for maintenance and addressing superficial concerns, but they have their limits. For certain skin goals and conditions, the strength, precision, and safety of a professional treatment are non-negotiable.
It’s time to skip the DIY and book an appointment if you have:
Deep acne scars or etched-in wrinkles: At-home peels only work on the epidermis (top layer of skin). Deep scars and wrinkles exist in the dermis, and improving them requires medium-depth peels that stimulate collagen production at a much deeper level.
Significant melasma or sun damage: Melasma is a complex form of hyperpigmentation often triggered by hormones and inflammation. An improper peel can easily make it worse. A professional can diagnose the depth of the pigment and choose the correct treatment protocol.
A desire for rapid, dramatic change: While at-home peels deliver gradual improvement with consistent use, professional treatments offer more significant and faster results for a big event or a major skin reset.
Highly sensitive, reactive, or rosacea-prone skin: An esthetician can properly assess your skin’s sensitivity and choose a peel and protocol that won’t cause a flare-up. Their expertise minimizes the risk of a reaction.
You’re a first-timer who feels unsure: If you feel nervous or overwhelmed by the process, there is no substitute for the peace of mind that comes with being in an expert’s hands.
Why Professional Peels Shine
The value of a professional peel extends far beyond just access to stronger acids. It’s about the comprehensive, expert-led experience. During a consultation, a licensed esthetician performs a custom analysis of your skin type, history, and lifestyle. This allows them to select the perfect acid type and strength and to prep your skin correctly for optimal results. Throughout the treatment, they provide constant monitoring and precise neutralization, ensuring the peel is both effective and safe. This dramatically lowers the risk of complications like burns or uneven results. Finally, they provide you with clear, personalized pre- and post-care instructions to ensure you heal beautifully and protect your investment.
Want expert guidance near Burlington or neighboring towns like Lexington or Woburn? Our licensed estheticians at SA Blissful Spa are happy to create a plan that’s safe and effective for your skin.
Conclusion
So, to answer the question one last time: yes—you absolutely can do a facial chemical peel at home. The key to success lies in treating the process with respect. As long as you choose gentle formulas appropriate for your skin type, stick to safe percentages, follow the application and timing directions exactly, and commit to protecting your fresh, vulnerable skin with daily SPF, an at-home peel can be a budget-friendly and effective way to boost your glow and maintain your skin’s health.
Remember the core principles: start slow, patch test, do not over-exfoliate, and listen to your skin. For ongoing maintenance and tackling mild surface concerns, a DIY peel is a powerful tool.
However, if you’re aiming for deeper resurfacing, need to address more significant concerns like scarring or melasma, or simply want the peace of mind that comes with professional oversight, we’re here to help. Schedule a professional chemical peel at SA Blissful Spa, Burlington MA. Our experts are proud to serve Burlington, Arlington, Lexington, Woburn, and all surrounding communities with customized, results-driven skincare in a serene and welcoming environment.
Glow safely, and we’ll see you in the treatment room!
Table Of Contents
Unwind. Rejuvenate. Repeat.
Let us pamper you from head to toe— book your appointment and discover true tranquility.
A place to relax, renew and be pampered. Allow tranquility to embrace you as you enter our blissful oasis of comfort. We are here, committed to fulfilling your every need.