Looking for the best at home underarm wax? Here’s a quick answer to save you time:
Tired of the daily shaving routine that leaves your underarms with stubble just hours later? The best at home underarm wax options offer a game-changing alternative that can keep your skin smooth for 4-6 weeks at a time. Unlike shaving, which merely cuts hair at the surface, waxing removes hair from the root, resulting in slower regrowth and, over time, finer hair texture. At-home waxing has become increasingly accessible, with formulations designed specifically for sensitive underarm skin and easy-to-use applicators that make the process nearly foolproof.
While salon waxing delivers professional results, the convenience and cost savings of DIY options make them incredibly appealing for busy routines. Modern at-home kits come with soothing ingredients like aloe vera, chamomile, and sunflower oil to minimize irritation and redness – common concerns when treating delicate underarm skin.
As a licensed esthetician and founder of SA Blissful Spa, I’ve helped countless clients achieve smooth, irritation-free underarms with the best at home underarm wax techniques and recommended quality products for those maintaining results between appointments.
Easy best at home underarm wax glossary:
– first time underarm hair removal
– is veet effective on underarms
– armpit waxing
If you’re on the fence about switching from shaving to waxing your underarms, consider these compelling benefits:
As one client told us, “I used to shave my underarms every morning before work. Now with waxing, I don’t even think about underarm hair for a month at a time!”
Wondering if you can safely wax your underarms at home? The good news is that yes—underarm waxing is generally safe for most people when done correctly. That said, it’s important to understand what you’re getting into before you start pulling those strips!
When clients at SA Blissful Spa ask me about DIY waxing between appointments, I always walk them through what to expect. Your underarms might experience some temporary redness and irritation after waxing—this is completely normal and typically fades within a few hours. First-time waxers or those with sensitive skin might notice some mild bruising, which is also usually nothing to worry about.
The risks that do require caution include potential burns (only if you’re using heated wax and don’t follow temperature guidelines) and folliculitis, which is just a fancy term for inflamed hair follicles that can sometimes occur after waxing.
“At-home waxing is safe for most people when instructions are followed carefully,” explains Dr. Karan Lal, a board-certified dermatologist. “The underarm area is actually less sensitive than many people expect, making it a good starting point for at-home waxing beginners.”
One safety step I always emphasize: perform a patch test 24 hours before your first full application. This simply means applying a small amount of wax to a discreet area of skin to check for any adverse reactions. It’s a small step that can save you from potential discomfort!
The key to safe at-home waxing truly comes down to three things: proper preparation, good technique, and appropriate aftercare. When clients follow these principles, they usually have great results between their professional appointments with us.
While the best at home underarm wax can work wonderfully for most people, there are some groups who should put down the wax and step away:
If you’re using prescription retinoids like tretinoin or even over-the-counter retinol products, take a break from them at least one week before waxing. These products make your skin more sensitive and can actually cause painful lifting of skin during waxing—definitely not the smooth experience we’re aiming for!
Anyone currently taking isotretinoin (Accutane) should avoid waxing entirely. This medication makes skin extremely fragile, and waxing could cause serious damage.
Those with active skin conditions like eczema, psoriasis, or sunburn in the underarm area should wait until the skin has completely healed before waxing. Your skin is already compromised, and waxing could make things worse.
People with diabetes may have reduced sensation and could be at higher risk for complications. I always recommend consulting with your doctor first if you have diabetes and want to try at-home waxing.
Finally, if you have any unusual growths or skin changes in your underarm area, please see a dermatologist before attempting any hair removal method. Safety first!
If you’re unsure whether DIY waxing is right for you, we at SA Blissful Spa are always happy to provide a consultation and recommend the safest hair removal method for your specific needs.

Getting your hair length just right is absolutely crucial for successful underarm waxing. Think of it as the Goldilocks principle—not too short, not too long, but just right.
The ideal hair length for underarm waxing is about 1/4 to 3/4 inch (roughly the length of a grain of rice). When hair is too short, the wax simply can’t grip it properly, leading to patchy results and frustration. Too long, and you’re in for unnecessary pain plus a messier process.
For most people, this means waiting about 2-3 weeks after shaving before attempting to wax. Everyone’s hair grows at different rates, so you might need to adjust this timeline based on your personal growth pattern.
Before you wax, proper skin preparation makes all the difference. Start by cleansing thoroughly with an antibacterial soap to remove any deodorant, sweat, or oils. These can create a barrier that prevents the wax from adhering properly to the hair.
I recommend gentle exfoliation 2-3 days before waxing—not immediately before, as this can make your skin more sensitive. Exfoliation helps remove dead skin cells and can significantly reduce your chances of developing those pesky ingrown hairs afterward.
Make sure your underarms are completely dry before applying any wax. Even slight moisture can interfere with wax adhesion. After cleansing, pat the area dry and consider applying a light dusting of baby powder or cornstarch to absorb any remaining moisture.
Finally, always check your skin condition before waxing. If you notice any cuts, rashes, sunburn, or other irritation in your underarm area, it’s best to postpone your waxing session until your skin has healed.
I’ve found that proper preparation is truly half the battle when it comes to achieving a smooth, irritation-free waxing experience. Many first-time waxers who have issues are simply working with the wrong hair length or haven’t properly prepped their skin.
For more detailed information about getting your hair length just right, check out our comprehensive guide on armpit hair length for waxing.
Achieving salon-worthy results with the best at home underarm wax isn’t just about having the right product—it’s all about your technique and preparation. As someone who’s guided countless clients through this process at SA Blissful Spa, I can tell you that proper prep makes all the difference between “ouch!” and “wow!”
Timing your waxing session strategically can dramatically improve your experience. Try to schedule your DIY session when you’re relaxed and not rushing—many of our clients find evening works perfectly, giving any redness time to calm down overnight. And if possible, avoid waxing during your period when skin tends to be more sensitive to pain.
Your pre-wax routine should start about two days before the main event. Gently exfoliate your underarms 48 hours prior to waxing to remove dead skin cells and help prevent ingrown hairs. However, steer clear of exfoliation on waxing day itself—freshly exfoliated skin is more sensitive and prone to irritation.
On the day of your waxing, start with a warm shower. The heat helps open your pores and softens hair follicles, making the entire process less painful and more effective. Skip your usual deodorant application that day—antiperspirants and deodorants create a barrier that can prevent wax from properly gripping the hair.
Pain-reduction tricks that our clients swear by include taking an over-the-counter pain reliever like ibuprofen about 30 minutes before waxing. This can help reduce both discomfort and potential inflammation. A light dusting of baby powder on clean, dry underarms will absorb any lingering moisture, creating the perfect canvas for wax to adhere to hair rather than skin.

When you’re ready to begin with your best at home underarm wax, follow this tried-and-true process:
Start by carefully reading the instructions that came with your specific wax kit—each formulation has its own heating and application guidelines that should be followed precisely. If you’re using heated wax, always test a small amount on your inner wrist first to ensure it’s comfortably warm but not hot enough to burn your delicate underarm skin.
Position yourself in front of a well-lit mirror and raise your arm to fully expose the underarm area. Apply the wax in the direction of hair growth—and here’s where underarm waxing gets tricky: underarm hair often grows in multiple directions, so you may need to work in sections, applying wax with different directional strokes.
The secret to minimizing pain is proper technique. Use your free hand to hold the skin taut, creating a smooth, flat surface. This is absolutely crucial for effective hair removal and comfort. When it’s time to remove the wax, pull parallel to the skin (not upward) in one swift, decisive motion against the direction of hair growth. For hard wax, create a little “lip” at the edge to grip before pulling.
“Most people make the mistake of pulling upward instead of parallel to the skin,” shares our lead esthetician at SA Blissful Spa. “That technique change alone can reduce discomfort by half while still removing hair effectively.”
Immediately after removing the wax, press your hand firmly against the area. This counter-pressure helps alleviate pain instantly. Finally, use the post-wax oil or solution included in your kit to remove any residual wax and soothe the skin.
Even with perfect technique and the best at home underarm wax, some discomfort is part of the process—but it doesn’t have to be excruciating. Numbing creams applied 20-30 minutes before waxing can significantly reduce pain. Many of our clients also find that briefly icing the area before waxing helps numb the skin naturally.
Your mental state matters too—practice relaxed, deep breathing during waxing, as tension increases pain perception. Skipping that pre-wax coffee might help as well, since caffeine can increase sensitivity. And if you’re tracking your cycle, consider scheduling your waxing session after your period when pain tolerance is typically higher.
Preventing those frustrating ingrown hairs starts 48 hours after your waxing session. Begin a gentle exfoliation routine twice weekly to prevent dead skin buildup that can trap growing hairs. Products containing salicylic acid or glycolic acid work wonders for keeping pores clear and preventing ingrowns before they start.
Your post-wax wardrobe choices matter too—opt for loose-fitting clothes for the first day or two to reduce friction on freshly waxed skin. Keep the area clean and avoid heavy, pore-clogging moisturizers that might contribute to blocked follicles.
The good news? Regular waxing actually helps reduce ingrown hairs over time as the hair becomes finer and grows back with a natural tapered end rather than the blunt edge created by shaving. Many of our long-term waxing clients report significantly fewer ingrown hairs after just 3-4 consistent waxing sessions.
For more detailed guidance on navigating your first underarm waxing experience, check out our comprehensive guide on first time underarm hair removal.
Walking down the beauty aisle can feel like navigating a maze when you’re searching for the best at home underarm wax. With countless boxes promising smooth, salon-worthy results, how do you know which one will actually deliver? Let me guide you through this decision with some practical advice we share with our clients at SA Blissful Spa.
The first consideration is which type of wax will work best for your unique needs. Hard wax has become increasingly popular for underarm waxing because it adheres only to the hair, not your skin—making it significantly less painful for this sensitive area. If you have coarse underarm hair or sensitive skin, hard wax might be your new best friend.
Soft wax (also called strip wax) offers its own advantages—it’s excellent at capturing those fine, stubborn hairs and typically comes with easy-to-use cloth or paper strips. While it can be slightly more irritating than hard wax, many beginners find the application more straightforward.
For those concerned about ingredients, sugar wax provides a natural alternative that’s been used for centuries. Made primarily from sugar, lemon juice, and water, it’s water-soluble (hello, easy cleanup!) and tends to cause less irritation than traditional formulations. One of our clients with extremely sensitive skin swears she’ll “never use anything but sugar wax” after finding how gentle it can be.
When examining ingredient lists, look for soothing additions like aloe vera and chamomile which help calm redness. Titanium dioxide creates a protective barrier between the wax and your skin, while azulene offers anti-inflammatory benefits. We’ve found that waxes containing glyceryl rosinate tend to grip hair more effectively without adhering to skin, and natural oils like jojoba or sunflower provide post-wax moisture and comfort.
Temperature control matters tremendously when using heated wax. The best at home underarm wax kits often include digital temperature controls or clear indicators that show when the wax is ready to use. This prevents the too-hot scenario that can lead to burns or the too-cool situation where the wax simply doesn’t work effectively.
As for application methods, consider your comfort level with DIY beauty treatments. Pre-coated strips offer the simplest entry point for beginners—just warm between your hands, apply, and pull. Roll-on applicators provide precision with minimal mess, while traditional spatula application gives you more control but requires a steadier hand. Microwaveable pots offer convenience but demand careful attention to temperature.
Budget-wise, you’ll find options across the spectrum. Basic strip kits typically range from $6-$15, quality hard wax kits from $15-$30, and professional-grade warming systems from $25-$60. As we often tell our clients at SA Blissful Spa, “Sometimes investing a bit more upfront saves money in the long run.” A slightly pricier kit that delivers multiple sessions often provides better value than a cheaper option that’s only good for one use.
Let’s take a closer look at how each wax type performs specifically for underarm use:
Strip Wax excels at grabbing those fine underarm hairs and offers best convenience. Pre-coated strips require zero heating—just warm between your hands and go. The application is quick, making it perfect for busy mornings. However, because it adheres to skin as well as hair, it can cause more discomfort than other options. You might need multiple passes to catch all hairs, and you’ll need an oil-based remover to clean up any residue. Products like Nair Wax Ready-Strips and Veet Ready-to-Use Strips have perfected this technology.
Hard Wax has become something of a gold standard for underarm waxing among professionals. It only adheres to hair, not skin, making the process noticeably less painful—especially important in sensitive areas like underarms. It’s particularly effective on coarse hair, which many people have in their underarm region. The downsides? It requires heating, has a steeper learning curve, and can create a mess until you’ve mastered the technique. Bliss Poetic Waxing Kit and GiGi Mini Pro Waxing Kit represent quality options in this category.
Sugar Wax offers a gentle approach with natural ingredients that environmentally-conscious clients appreciate. The water-soluble formula rinses away easily—no oils needed for cleanup. Perhaps its biggest advantage is that you can immediately reapply to missed spots without waiting, unlike other wax types. The consistency can be tricky to work with initially, but products like Nad’s Sugar Wax Kit and Parissa Organic Sugar Wax have refined the formula for home use.
At SA Blissful Spa, we typically recommend hard wax for underarm areas, especially for those with sensitive skin. However, we’ve seen great results with high-quality strip waxes that include soothing ingredients, particularly for waxing newcomers who appreciate their straightforward application.
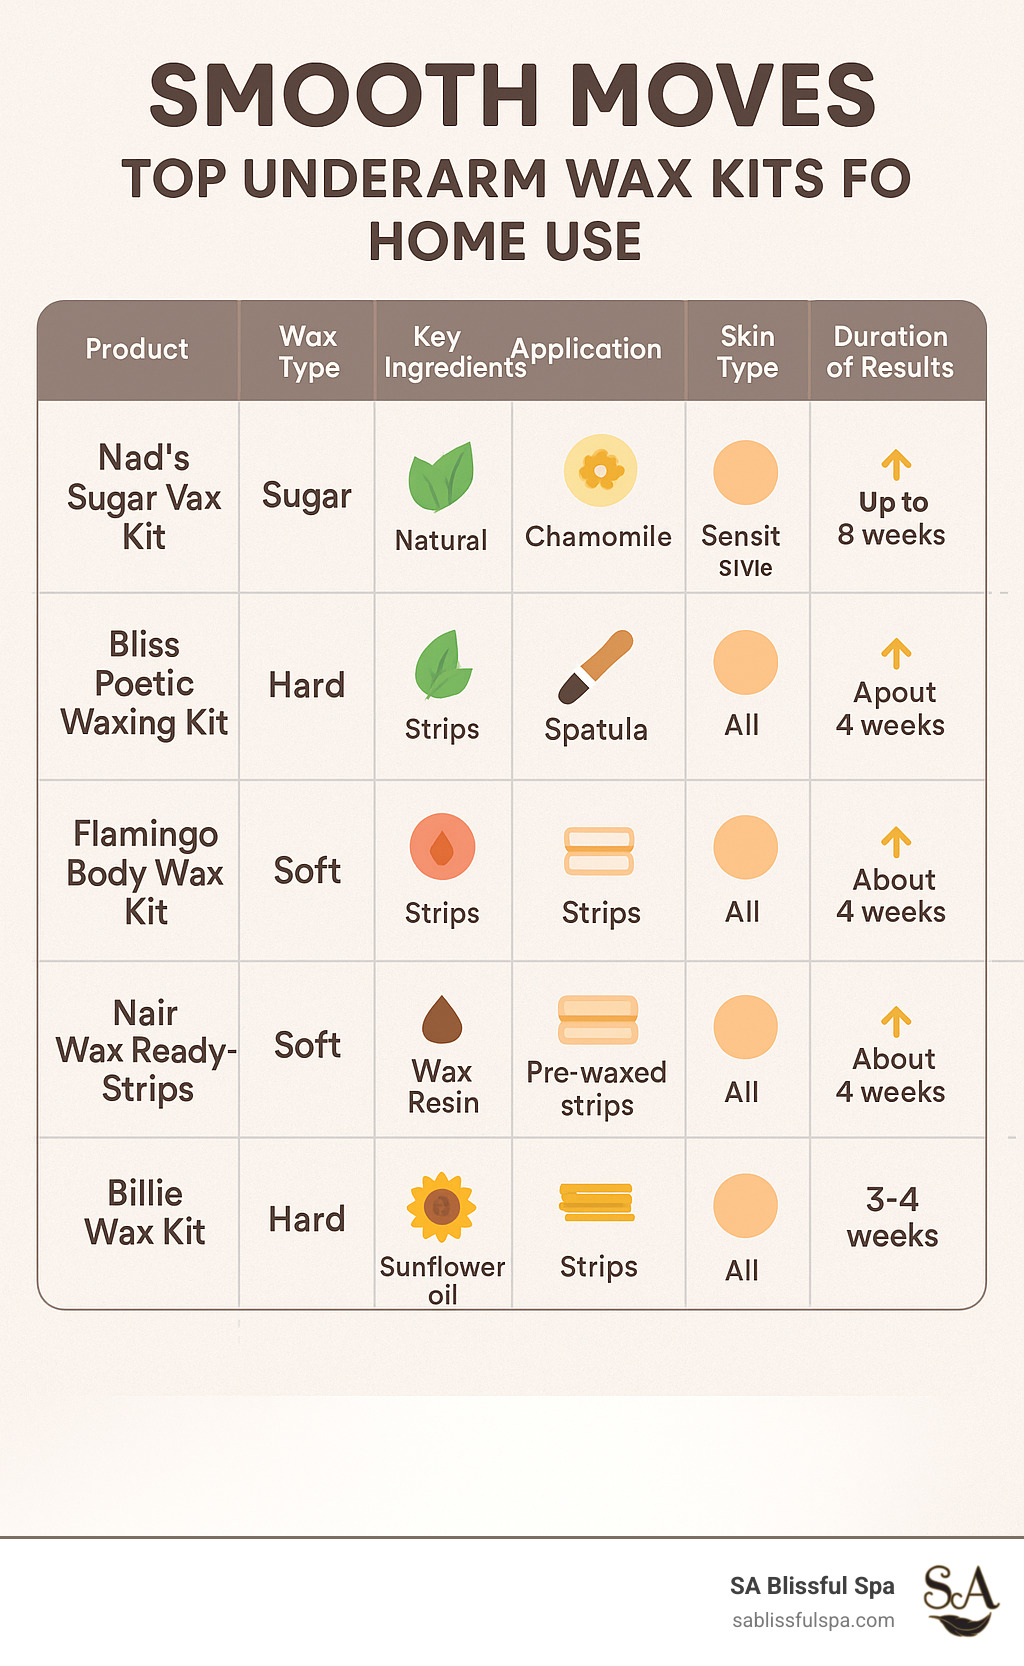
After years of professional experience and gathering feedback from both dermatologists and our clients, we’ve identified these standout options for the best at home underarm wax kits:
Nad’s Sugar Wax Kit takes our top overall spot with its natural formula of sugar, honey, and lemon juice. This gentle option can keep skin silky for up to 8 weeks, and the water-soluble formula makes cleanup wonderfully simple. Priced between $10-$15, it’s perfect for those with sensitive skin or preferences for natural ingredients.
For sensitive skin types, Bliss Poetic Waxing Kit delivers spa-quality results with its hard wax formula. The chamomile oil and soothing azulene create a gentler experience, while the stripless application grips hair without clinging to skin. At $20-$30, it’s a worthwhile investment for those with particularly sensitive underarms or coarse hair growth.
First-timers often find success with the Flamingo Body Wax Kit, which includes 28 strips in various sizes that work perfectly with underarm contours. The almond oil and glycerin infusion leaves skin moisturized, and it can effectively remove hair as short as 2mm. Priced at $10-$15, it’s an excellent entry point into at-home waxing.
Budget-conscious shoppers should consider Nair Wax Ready-Strips, which offers impressive value with 40 strips per package. Infused with chamomile and sunflower seed oil, these ready-to-use strips require no heating and work well across all skin types. At just $6-$10, they’re perfect for quick touch-ups between more thorough waxing sessions.
Finally, Billie Wax Kit has been specifically optimized for underarm use with its medium-sized strips that contour perfectly to this unique area. The luxurious blend of avocado oil, aloe vera, and shea butter minimizes tugging while effectively removing hair. This 2023 Beauty Award winner ranges from $10-$15 and represents thoughtful design for underarm-specific waxing.
For more detailed information about various underarm waxing options, our comprehensive guide on underarm hair wax covers everything you need to know to make an informed decision.
The journey to silky-smooth underarms doesn’t end when you pull off that last wax strip. In fact, what you do after your best at home underarm wax session can make all the difference between irritated, bumpy pits and gloriously smooth ones that stay that way for weeks.
Those first 24 hours post-wax are absolutely crucial. Your skin is essentially in recovery mode – pores are open, the area is more sensitive than usual, and it needs some TLC. Start by applying firm pressure to the freshly waxed area immediately after you’ve removed the wax. This simple step helps calm the skin and reduces that initial sting that many of us experience.
“I always tell my clients to think of the first day after waxing as a ‘recovery period’ for your underarms,” says our senior esthetician at SA Blissful Spa. “Your pores are open and vulnerable – treat them gently, and they’ll thank you with smooth, irritation-free results.”
Next, reach for something cooling and soothing. Aloe vera gel straight from the refrigerator works wonders, or use the post-wax soothing solution if your kit included one. The cool sensation provides immediate relief while the soothing ingredients help calm inflammation.
What you don’t do is just as important as what you do. Keep deodorant away from freshly waxed underarms for at least 24 hours – those antiperspirant ingredients can irritate sensitive skin and potentially clog pores. Also on the no-list: hot showers, saunas, swimming pools, intense workouts, and tight clothing. All of these can introduce sweat, bacteria, or friction to the area when it’s most vulnerable.
Instead, keep things clean with gentle, fragrance-free soap and lukewarm water. Pat – don’t rub – the area dry with a clean towel.
Once you’ve made it past the 48-hour mark, it’s time to introduce gentle exfoliation into your routine. This step is non-negotiable if you want to prevent those pesky ingrown hairs. A soft washcloth or a gentle chemical exfoliant with ingredients like salicylic acid can work wonders when used 2-3 times weekly. Just remember – gentle is the operative word here.
Did you know that freshly waxed underarms can be more susceptible to sun damage? It’s true! If you’re wearing something sleeveless and spending time outdoors, don’t forget to apply sunscreen to your underarm area to prevent hyperpigmentation.
With proper care, your best at home underarm wax results should last anywhere from 4-6 glorious weeks. That’s a far cry from the daily or every-other-day shaving routine many of us are used to! For more detailed information about what to expect, check out our comprehensive guide on how long does an armpit wax last?
Not all post-wax products are created equal. When choosing aftercare solutions for your sensitive underarm skin, look for these powerhouse ingredients:
Aloe vera is nature’s soother – it cools on contact while delivering anti-inflammatory compounds that reduce redness and irritation. It’s like a tall glass of water for angry skin.
Sunflower oil might sound counterintuitive for underarms, but it’s actually remarkably lightweight and packed with vitamins A, D, and E that help repair your skin barrier without clogging pores.
Vitamin E works overtime as both a healing agent and an antioxidant, helping repair tiny micro-tears in the skin while fighting free radical damage.
Titanium dioxide creates a protective shield on your skin’s surface, reducing irritation and helping prevent infection – particularly important in the warm, sometimes damp underarm environment.
Chamomile and its derivative azulene bring exceptional calming properties to sensitive post-wax skin. The compounds in chamomile help reduce inflammation and promote healing.
At SA Blissful Spa, we always recommend checking ingredient lists carefully. During those first critical 48 hours, steer clear of products containing alcohol, artificial fragrances, or harsh exfoliants – your freshly waxed skin will thank you!
Dr. Teresa Song, a dermatologist specializing in hair removal aftercare, notes that “proper post-wax care can reduce the risk of folliculitis by up to 80% and significantly extend the life of your waxing results.”
Want to make those smooth results last as long as possible? Here’s how to maximize the time between your best at home underarm wax sessions.
Consistent exfoliation is key – but only after that initial 48-hour recovery period. By gently removing dead skin cells 2-3 times weekly, you’re helping new hairs emerge properly instead of becoming trapped under the skin. A soft washcloth works well, as do chemical exfoliants containing salicylic or glycolic acid.
Keep your underarms well-moisturized daily with lightweight, non-comedogenic products. Well-hydrated skin means fewer dead cells buildup that can trap hairs, plus it keeps the area looking healthy and smooth.
Though it might be tempting to reach for the razor when you notice the first signs of regrowth, try to resist! Shaving between waxing sessions disrupts the hair growth cycle that makes waxing so effective. When you shave, you’re creating that blunt-edged stubble that waxing works to eliminate. Stay strong!
“The magic of waxing happens over time,” explains our lead esthetician at SA Blissful Spa. “Many of our clients notice that with regular sessions every 4-6 weeks, their underarm hair not only grows back more slowly but actually becomes finer and sparser. This happens because consistent waxing gradually weakens the hair follicles.”
For those looking for extra insurance against quick regrowth, consider products containing natural hair growth inhibitors like papain and papaya extract. While not miracle workers, these ingredients may help slow regrowth when used consistently between waxing sessions.
The ultimate secret to extending smoothness? Consistency. By establishing a regular waxing schedule – typically every 4-6 weeks – you’re training those hair follicles to weaken over time. Many of our clients find that after 6-8 consistent waxing sessions, they notice significantly finer, sparser regrowth that’s less noticeable even as it starts to come back in.
Curious about trying the best at home underarm wax but still have questions? You’re not alone! At SA Blissful Spa, we hear these concerns from clients daily. Let’s address the most common questions to help you feel confident in your DIY waxing journey.
The sweet spot for underarm waxing is typically 4-6 weeks between sessions. This timing allows your hair to reach that ideal “grain of rice” length (¼ to ¾ inch) where the wax can grip effectively without being painfully long.
I’ve noticed with my clients that consistency is truly key here. When you maintain a regular schedule, your body actually begins to adapt. Many of our regulars at SA Blissful Spa report that their hair growth cycles become more predictable and manageable over time.
“I tried waxing whenever I noticed significant growth, but switching to a consistent 5-week schedule made a huge difference,” one client told me recently. “Not only is each session less painful, but I’m seeing less hair coming back overall.”
If you wax too frequently (before that 4-week mark), you risk breaking hairs rather than removing them from the root, which defeats the purpose of waxing. Wait too long, and you’re in for a more uncomfortable experience with thicker regrowth.
If you have generally sensitive skin without active conditions, you can absolutely try waxing—just with extra precautions. Look for the best at home underarm wax products specifically formulated for sensitive skin, containing soothing ingredients like aloe vera, chamomile, or azulene.
For sensitive skin types, I recommend:
– Always perform a patch test 24 hours before your full application
– Choose hard wax or sugar wax over soft strip wax, as they’re generally gentler
– Apply a thin layer of powder before waxing to create a protective barrier
– Keep a cooling, alcohol-free gel ready for immediate application afterward
However, if you have active eczema, psoriasis, or other inflammatory skin conditions in your underarm area, it’s best to press pause on waxing until the flare-up resolves. The trauma of waxing can potentially worsen these conditions and lead to increased irritation or even infection.
One of our clients with occasional eczema follows a simple rule: “If my skin feels at all irritated or looks red, I reschedule my waxing for the following week. Better safe than sorry!”
If you’re unsure about your specific situation, I’d recommend consulting with a dermatologist or scheduling a consultation with us at SA Blissful Spa to discuss your individual skin concerns.
This is one of those pleasant surprises many of our clients report! While waxing doesn’t directly affect your sweat glands, many people do experience reduced underarm odor after switching from shaving to waxing. There’s actually some science behind this observation.
Underarm odor primarily comes from bacteria breaking down your sweat—not from the sweat itself. When you remove hair from the root through waxing:
You eliminate a surface where bacteria thrive. Hair traps bacteria against your skin, and removing it creates a less hospitable environment for odor-causing microbes.
You reduce trapped moisture. Without hair to hold sweat against your skin, there’s less moisture for bacteria to process into those familiar underarm odors.
You can cleanse more thoroughly. A smooth underarm allows for more effective washing and deodorant application.
About 70% of our regular waxing clients at SA Blissful Spa report noticing less underarm odor after several months of consistent waxing. This benefit seems especially pronounced for those who previously experienced irritation from shaving.
“I was shocked at how much less I needed to worry about reapplying deodorant throughout the day after I switched to waxing,” shared one of our long-term clients. “It’s been a game-changer for my confidence during workout classes.”
Remember though, you’ll still perspire normally—waxing doesn’t affect the actual sweat glands or their function. But that sweat may be less likely to develop into noticeable odor with regular waxing maintenance.
Finding the best at home underarm wax isn’t just about convenience—it’s about changing your beauty routine with results that truly last. After testing countless products and helping hundreds of clients perfect their at-home waxing techniques, I’ve seen how the right wax and proper technique can deliver weeks of smooth, confident underarms.
The products we’ve highlighted throughout this guide—from the natural ingredients in Nad’s Sugar Wax to the sensitive skin formulation of Bliss Poetic Waxing Kit—each offer something special for different needs and experience levels. Your perfect match depends on your unique skin sensitivity, hair type, and comfort with the waxing process.
At SA Blissful Spa, we often hear from clients who combine at-home maintenance with occasional professional treatments. This hybrid approach gives you the cost savings of DIY care while still benefiting from expert techniques when you need a refresh or special occasion prep. It’s like having the best of both worlds!
Many of our first-time waxers start their journey with pre-cut strips like those in the Flamingo Body Wax Kit, then graduate to hard wax as they gain confidence. Others fall in love with the gentle, eco-friendly nature of sugar waxing and never look back. There’s no single “right” path—just the one that works best for your body and lifestyle.
What matters most isn’t which best at home underarm wax you choose, but that you follow the preparation, application, and aftercare guidelines we’ve outlined. These steps make all the difference between a painful, irritation-filled experience and the smooth, long-lasting results you’re looking for.
For those times when you’d prefer professional care—perhaps before a vacation or special event—or if you have specific skin concerns that need expert attention, our team at SA Blissful Spa is always here to help. Our trained estheticians specialize in gentle, effective waxing for all skin types and can provide personalized recommendations for your at-home routine.
Curious about professional waxing services? Visit our guide to finding professional help when you’re ready to treat yourself to expert care.
Whether you’re mixing up a batch of homemade sugar wax or investing in a professional-grade warming kit, practice makes perfect. Each waxing session gets a little easier, a little less painful, and delivers increasingly better results as your hair begins to grow back finer and sparser.
Your journey to smoother underarms starts here—with the right tools, techniques, and a little patience. From all of us at SA Blissful Spa, happy waxing!
